Vue3에서 swiper 사용법 (오류 해결법)
swiper는 슬라이드를 만들때 사용하는 라이브러리로 많은 사랑을 받고 있습니다. 대부분의 사이트에서 슬라이드를 구현할 때 스와이퍼를 사용하죠.
swiper의 공식 사이트에 가보면 기본 js 뿐만아니라 react, angular, vue의 demo 코드도 제공하기 때문에 초심자들도 따라 배우기가 쉽습니다.
Swiper Demos
Swiper is the most modern free mobile touch slider with hardware accelerated transitions and amazing native behavior.
swiperjs.com
문제
그런데 공식 사이트에서 제공하는 demo 코드 방식으로 vue3 프로젝트에 swiper를 사용하면 아마 에러가 날 것입니다.
(에러 나는걸 올려놓으면 어떻게해...)
자료가 많지 않아서 오랫동안 삽질하다가 방법을 찾았던 기억이 나네요. 다른분들은 삽질 덜하시라고 해결방법을 공유 해보려 합니다.
오류나던 방법 (swiper 공식 사이트 그대로)
먼저 공식 사이트에서 제공하는 방식 그대로 vue3에 적용을 해보겠습니다.
1. Vue CLI를 사용하여 vue3 프로젝트를 생성

2. npm i swiper로 swiper를 설치 (2022년 2월 기준 swiper 8이 다운된다)

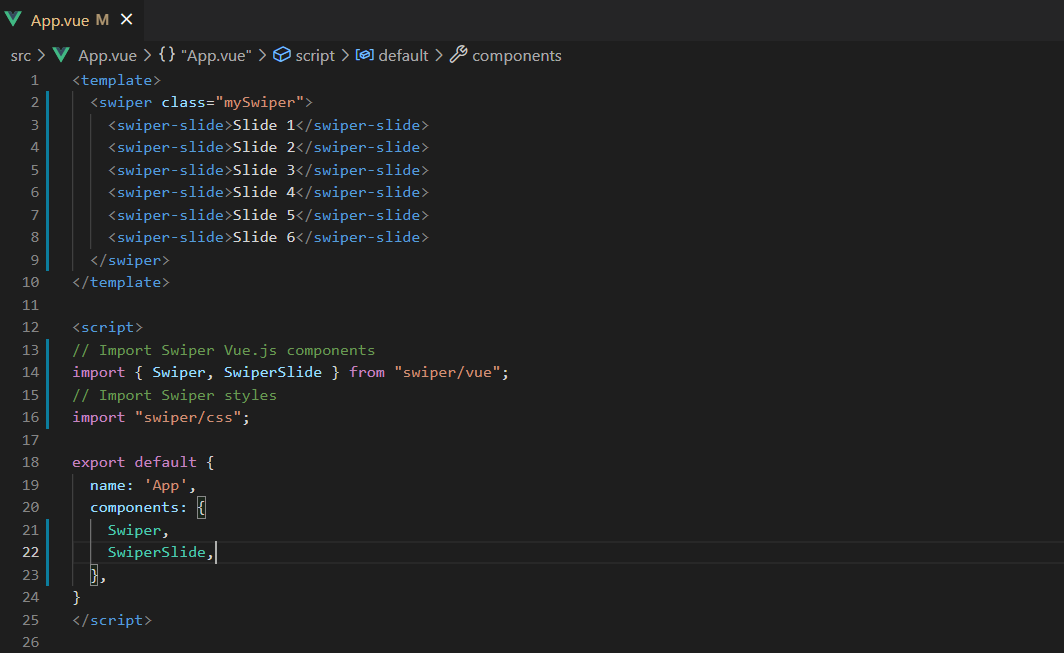
3. 원하는 위치에 swiper 컴포넌트를 import해서 사용

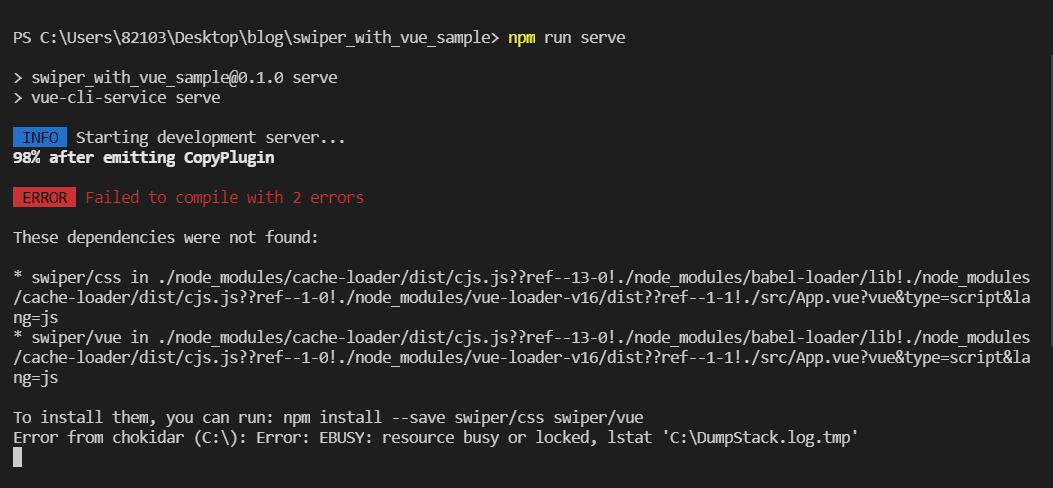
4. npm run serve시 에러 발생

demo 코드 그대로 했는데 에러가 났습니다. 왜그럴까요?
에러 원인
에러가 나는 원인는 import 하는 부분의 경로가 잘못됐기 때문입니다.
컴파일러가 'node modules' 폴더를 보니, 해당 경로와 매칭되는 파일이 없어서 'These dependencies were not found' 라는 문구를 내보내는 것입니다. (맞겠지..?)
// 에러 나는 부분
import { Swiper, SwiperSlide } from "swiper/vue";
import "swiper/css";
해결방법
에러를 해결하는 방법에는 두가지가 있습니다.
첫번째는 이전 버전인 swiper 6 버전을 사용하는 방법이고, 두번째는 잘못된 import 경로를 변경해주는 방법입니다(swiper 7~8).
1. swiper 6 버전 사용
* swiper 6도 2021년 8월에 나왔으니 그리 차이나지 않습니다. 사용해도 문제될 건 없습니다.
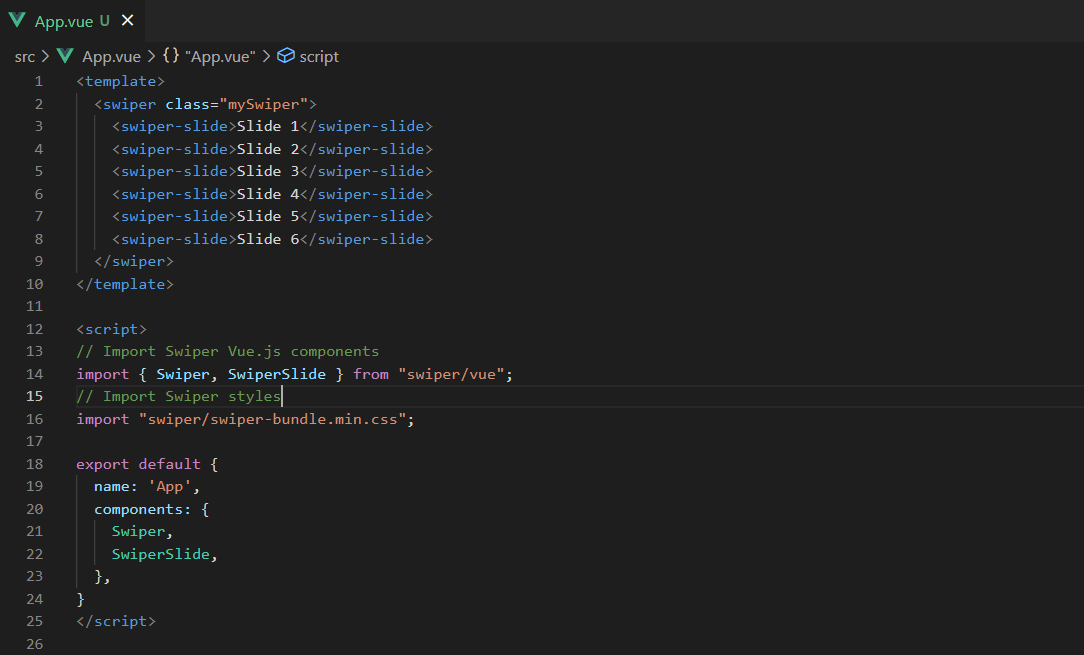
1. npm i swiper@6.8.4로 swiper 6를 설치 (6버전 중 가장 나중버전인 6.8.4 사용 권장)

2. import "swiper/css" 부분을 import "swiper/swiper-bundle.min.css"으로 바꾼다.
import { Swiper, SwiperSlide } from "swiper/vue";
import "swiper/swiper-bundle.min.css";	// 여기 바꿈
2. import 경로 변경 (swiper 7,8)
// 에러 나는 부분
import { Swiper, SwiperSlide } from "swiper/vue";
import "swiper/css";
위에서 에러가 나는 이유는 잘못된 경로로 import 했기 때문이라 했었습니다. 그럼 경로를 올바르게 바꿔주면 되겠죠?
node modules안에 설치한 swiper 폴더를 살펴봅시다.
아래의 표는 버전별로 node modules안의 swiper 폴더 구조를 나타낸 것입니다. swiper 폴더 안에는 css 파일과 vue 폴더가 담겨있습니다.
| <node modules안의 swiper 폴더 구조> | |
| swiper 7,8 | swiper 6 |
( * swiper 8은 context.js 파일 추가됨 ) |
 |
 |
|
위의 폴더 구조에 맞도록 코드를 변경하면, 아래와 같이 됩니다.
import { Swiper, SwiperSlide } from "swiper/vue/swiper-vue";
import "swiper/swiper-bundle.min.css";
이제 npm run serve 실행시 정상적으로 작동할 것입니다.
Pagination, Autoplay... 등 모듈 적용 방법
추가로 알려드릴게 있는데요. 버전에 따라 pagination과 autoplay등의 모듈을 적용하는 방법이 조금 다릅니다.
마지막으로 모듈 적용방법만 간단하게 보여드릴게요.
1. swiper 6 모듈 적용
<template>
  <swiper class="mySwiper"
    :autoplay="true">
    <swiper-slide>Slide 1</swiper-slide>
    <swiper-slide>Slide 2</swiper-slide>
    <swiper-slide>Slide 3</swiper-slide>
  </swiper>
</template>

<script>
// Import Swiper Vue.js components
import { Swiper, SwiperSlide } from "swiper/vue";
// Import Swiper styles
import "swiper/swiper-bundle.min.css";

import SwiperCore, { Autoplay } from "swiper";
SwiperCore.use([ Autoplay ]);

export default {
  name: 'App',
  components: {
    Swiper,
    SwiperSlide,
  },
}
</script>
2. swiper 7 이상 모듈 적용
* swiper 버전이 7 이상일 때에도 swiper 6에서 썼던 Swipercore를 사용하는 방식은 가능합니다.
<template>
  <swiper class="mySwiper"
    :modules="modules"
    :autoplay="true">
    <swiper-slide>Slide 1</swiper-slide>
    <swiper-slide>Slide 2</swiper-slide>
    <swiper-slide>Slide 3</swiper-slide>
  </swiper>
</template>

<script>
// Import Swiper Vue.js components
import { Swiper, SwiperSlide } from "swiper/vue/swiper-vue";
// Import Swiper styles
import "swiper/swiper-bundle.min.css";

import { Autoplay } from "swiper";

export default {
  name: 'App',
  components: {
    Swiper,
    SwiperSlide,
  },
  setup() {
    return {
      modules: [Autoplay],
    };
  },
}
</script>
마무리
다들 에러 잘 해결하고 순조롭게 vue에서 swiper를 사용하셨으면 좋겠습니다 :)
swiper에 큰 업데이트가 있으면 방법이 바뀔 수 있으니 node modules의 swiper 폴더 내부를 항상 잘 확인하시고 테스트도 해보시길 바래요.
* 오류 지적은 언제나 환영입니다 :)
'Frontend > 라이브러리' 카테고리의 다른 글
| Vue에서 Swiper 옵션 바인딩으로 정리하기 (0) | 2022.02.06 |
|---|---|
| Swiper 양쪽 끝에서 드래그시 밀림 막기 (0) | 2022.01.30 |


댓글